How to Crochet Boris the Bear
Boris the bear is our third character taking part in Amigurumi April. After waking up from hibernation Boris was feeling very hungry and found some honeycomb, only now he is having a spot of bother with the bees! Find out more about the designer Jane Moloney below and start creating your own Boris the Bear.
You will need
Subtotal
Is $ 9.49
Subtotal
Is $ 5.49

Subtotal
Is $ 6.49

Subtotal
Is $ 4.49
Subtotal
Is $ 3.49
Subtotal
Is $ 4.49
Out of stock
Subtotal
Is $ 5.49
Subtotal
Is $ 5.49
Subtotal
Is $ 5.49
Subtotal
Is $ 3.49
Subtotal
Is $ 6.49
How to Make
You will also need:
20mm Safety toy joints x2
Abbreviations
This pattern is written in UK terms.
dc = double crochet (US single crochet)
htr = half treble crochet (US half double crochet)
tr = treble crochet (US double crochet)
2dc in next st = increase by 2 double crochet in the stitch
dc2tog = decrease by 2 working 2 double crochet stitches together
ss = slip stitch
ch = chain
( ) = repeat the section within the brackets the stated number of times.
Finished Size and Tension:
Size – Boris is Approx. 28cm (11 inches) tall when standing.
Tension – approx. 6 stitches and 6 rounds in 2.5cm (1 inch) over double crochet using a 3.5mm hook in DK acrylic yarn.
FEET AND LEGS
Using Yarn A. Make 2.
Starting at the tip of the feet, ch 6. You will be working around both sides of this chain so your first stitches should be worked into the top loop of the chain.
Round 1 (RS): 1dc in the top loop of the 2nd chain from the hook, 1dc in each of next 3 sts (continuing to place stitches in the top loop of the chain) 3dc in next st, rotate and work into the opposite side of the ch, 1dc in each of next 3 sts, 2dc in next ch. (12 sts)
Round 2: (1dc in each of next 5 sts, 3dc in next st) twice. (16 sts)
Round 3: 1dc in each of next 6 sts, 3dc in next st, 1dc in each of next 7 sts, 3dc in next st, 1dc in next st. (20 sts)
Round 4: 1dc in each of next 7 sts, 3dc in next st, 1dc in each of next 9 sts, 3dc in next st, 1dc in each of next 2 sts. (24 sts)
Rounds 5-8: 1dc in every stitch around.
Round 9: (Dc2tog, 1dc in each of next 2 sts) 6 times. (18 sts)
Round 10: 1dc in every stitch around.
Round 11: 1dc in each of next 14 sts and turn. (14 sts)
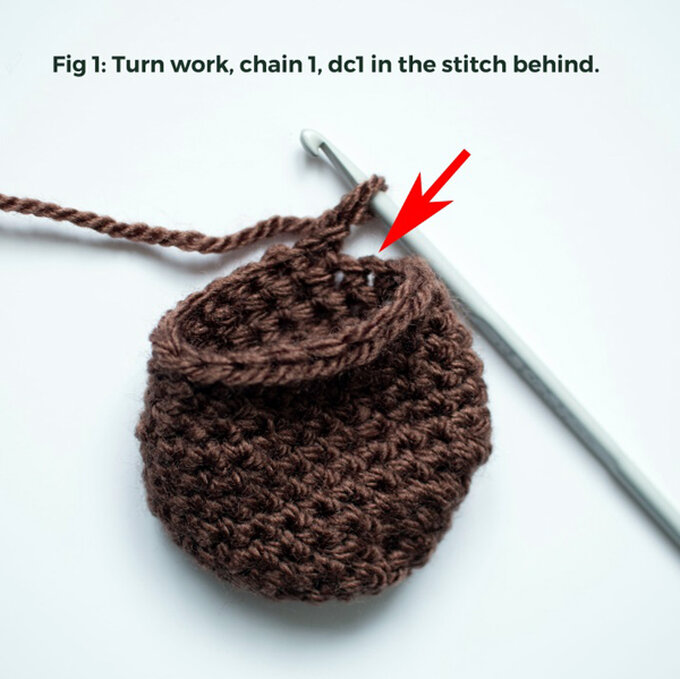
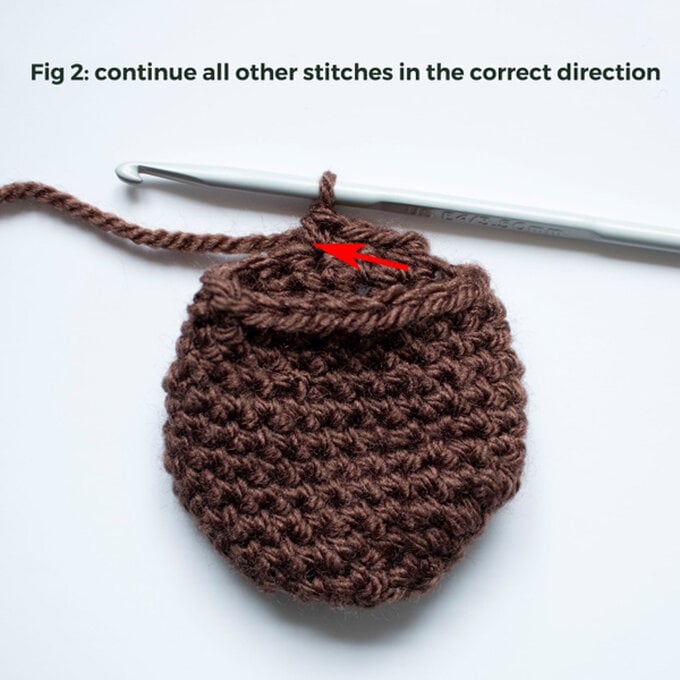
You are now going to start working in rows to shape the heel. See Fig 1 and 2.
Round 12: Ch1 (does not count as a st here and throughout), 1dc in the stitch BEHIND the st at base of ch, (this will feel strange as you are working in the opposite direction from left to right, for this stitch only), 1dc in each of next 3 sts working back in the usual direction (right to left), turn. (4 sts)
Round 13: Ch1, 1dc in the stitch behind (as you did in Round 12), 1dc in each of next 5 sts back in the correct direction, turn. (6 sts)
Round 14: Ch1, 1dc in the stitch behind, 1dc in each of next 7 sts, turn. (8 sts)
Round 15: Ch1, 1dc in the stitch behind, 1dc in each of next 9 sts, turn. (10 sts)
Round 16: Ch1, 1dc in the stitch behind, 1dc in each of next 11 sts, turn. (12 sts)
Round 17: Ch1, 1dc in the stitch behind, 1dc in each of next 13 sts, turn. (14 sts)
Round 18: Ch1, 1dc in the stitch behind, 1dc in each of next 15 sts, turn. (16 sts)
Round 19: Ch1, 1dc in the stitch behind, 1dc in each of next 17 sts, turn. (18 sts)
The heel shaping is now complete and you will now return to working in the round. You will also need to start stuffing the leg now. Continue to stuff at regular intervals as you crochet.
Rounds 20-30: 1dc in every stitch around.
Round 31: (Dc2tog, 1dc in each of next 4 sts) 3 times. (15 sts)
Rounds 32-33: 1dc in every stitch around.
Round 34: (Dc2tog, 1dc in each of next 3 sts) 3 times. (12 sts)22
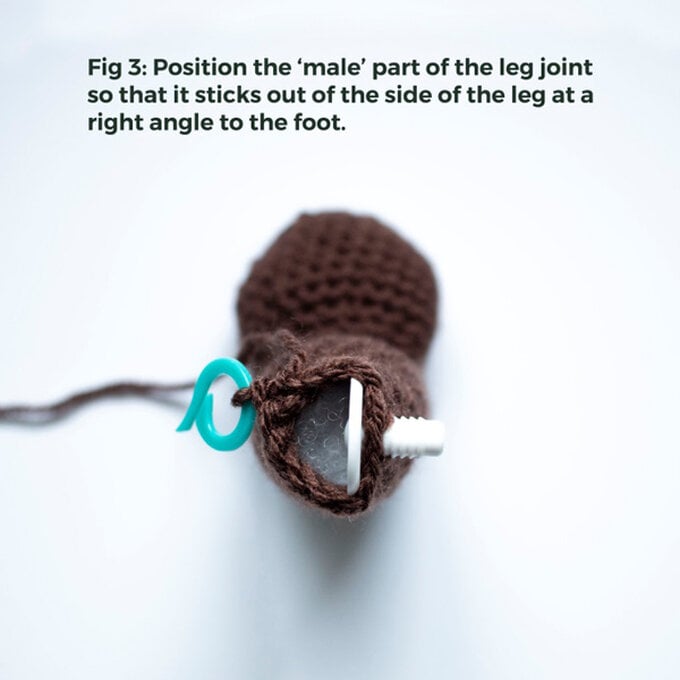
In the next row you are going to make a small hole, using a ch space, to insert the screw part part of the toy joint through. The joint needs to be positioned so that it sticks out of the side of the leg, at a right angle to the foot (see fig 3). The position of this hole will change depending on whether you are working on the right or left leg, as the joints will be inserted into either side of the body and you want to make sure both feet are pointing in the same direction!
Round 35: 1dc in every stitch until you reach the point where you want to place your joint. At that point, ch1, skip 1 stitch (this creates the hole for the joint) and then continue to place 1dc in every stitch until the end of the round. (12 sts, including ch-sp)
Push the toy joint though the hole you have made so the flat round side is inside the leg.
Round 36: 1dc in every stitch around.
Round 37: (Dc2tog, 1dc in each of next 2 sts) 3 times (9 sts)
Ss in next st and fasten off leaving a long tail of yarn which you can use to close up the top of the leg with a tapestry needle.
BODY
Make 1.
Using Yarn A, starting at the top of the body, make a 'magic ring' by winding the yarn around your finger a couple of times to form a ring. Insert your hook through the ring, catching and pulling through the yarn so that you have a loop on your hook. Yo and pull through the loop on your hook making a ch (this ch does not count as your first stitch)
Round 1: 6dc into the ring. (6 sts)
Close the ring by pulling the tail end of yarn.
Round 2: (2dc in next st) 6 times. (12 sts)
Round 3: (2dc in next st, 1dc in next st) 6 times. (18 sts)
Round 4: (2dc in next st, 1dc in each of next 2 sts) 6 times. (24 sts)
Round 5: (2dc in next st, 1dc in each of next 3 sts) 5 times, 1dc in each of next 4 sts. (29 sts)
Round 6: 1dc in every stitch around.
Round 7: (2dc in next st, 1dc in each of next 4 sts) 5 times, 1dc in each of next 4 sts. (34 sts)
Round 8: 1dc in every stitch around.
Round 9: (2dc in next st, 1dc in each of next 5 sts) 5 times, 1dc in each of next 4 sts. (39 sts)
Round 10: 1dc in every stitch = 39 stitches
Round 11: (2dc in next st, 1dc in each of next 6 sts) 5 times, 1dc in each of next 4 sts. (44 sts)
Round 12: 1dc in every stitch around.
Round 13: (2dc in next st, 1dc in each of next 7 sts) 5 times, 1dc in each of next 4 sts. (49 sts)
Round 14: 1dc in every stitch around.
Round 15: (2dc in next st, 1dc in each of next 8 sts) 5 times, 1dc in each of next 4 sts. (54 sts)
Rounds 16-25: 1dc in every stitch around.
Round 26: (Dc2tog, 1dc in each of next 7 sts) 6 times. (48 sts)
Round 27: 1dc in every stitch around.
Start to stuff the top part of the body firmly. Do not stuff again until after leg joints are inserted as you need space to fit the joints.
Round 28: (Dc2tog, 1dc in each of next 6 sts) 6 times. (42 sts)
Round 29: 1dc in each of next 7 sts, (dc2tog) 4 times, 1dc2, (dc2tog) 4 times, 1dc in each of next 7 sts = 34 stitches
Round 30: 1dc in each of next 7 sts, (dc2tog) twice, 1dc in each of next 12 sts, (dc2tog) twice, 1dc in each of next 7 sts. (30 sts)
Round 31: 1dc in each of next 7 sts, ch1, skip 1 st, 1dc in each of next 14 sts, ch1, skip 1 st, 1dc in each of next 7 sts. (30 sts, including ch spaces)
Mark the chain spaces with stitch markers so that you can locate them easily when inserting leg joints into the body.
Round 32: (Dc2tog, 1dc in each of next 3 sts) 6 times. (24 sts)
Round 33: (Dc2tog, 1dc in each of next 2 sts) 6 times. (18 sts)
Round 34: (Dc2tog, 1dc in next st) 6 times. (12 sts)
Insert leg joints into the body through the ch spaces you made in Round 31. Secure legs to body by pushing the 'locking washer' over the end of the leg joint. (If you are finding it difficult to secure the joints in the space you may need to remove a bit of stuffing to make it easier.) The pattern has been designed so that the back is flatter, and the tummy is fuller so ensure you insert your legs so that they face in the correct direction. Continue to stuff the rest of the body.
Round 35: (Dc2tog) 6 times. (6 sts)
Ss in next st and fasten off leaving a long tail of yarn. Using a tapestry needle and the tail of yarn, close up the hole.
MUZZLE
Make 1.
Using Yarn B, make a magic ring as given for body.
Round 1: dc4 into the ring, close the ring = 4 stitches
Round 2: (3dc in next st) 4 times = 12 stitches
Round 3: 1dc, 3dc in next st, htr2, tr3inc, tr2, tr3inc, htr2, 3dc in next st, 1dc = 20 stitches
Round 4: ss into the next 3 stitches, 1dc, htr3, tr3inc, tr4, tr3inc, htr3, 1dc, ss in the next 3 stitches = 24 stitches.
Round 5-6: 1dc in every stitch = 24 stitches.
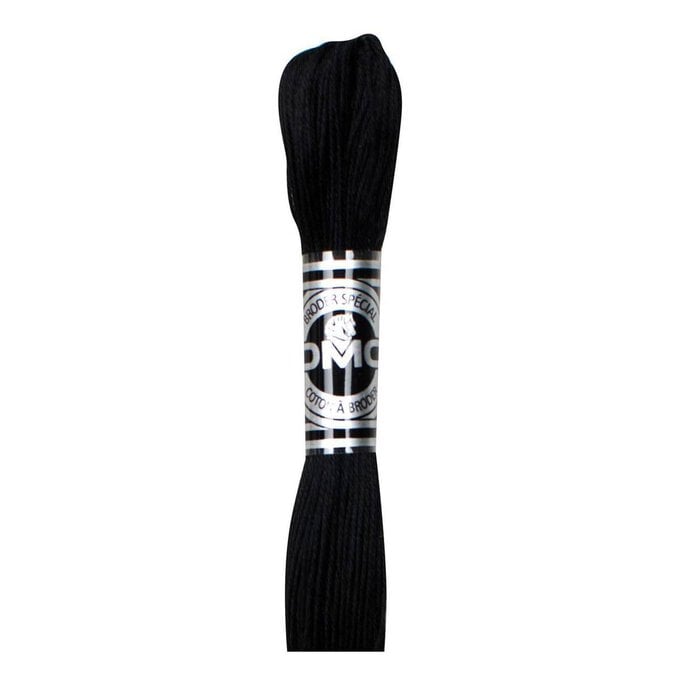
Ss in next st and fasten off. Then, using a satin stitch, embroider the nose onto the mussel piece with the black embroidery thread and the darning needle.
HEAD PATCH
Using Yarn B. Make 1.
Make a magic ring
Round 1: 6dc into the ring, close the ring = 6 stitches
Round 2: (2dc in next st) 6 times = 12 stitches
Round 3: (2dc in next st, 1dc) 6 times = 18 stitches
Round 4: (2dc in next st, dc2) 6 times = 24 stitches
Ss in next st and fasten off.
HEAD
Using Yarn A. Make 1.
Starting at the bottom of the head, make a 'magic' ring.
Round 1: 6dc into the ring. Close the ring = 6 stitches.
Round 2: (2dc in next st) 6 times = 12 stitches
Round 3: (2dc in next st, 1dc in next st) 6 times = 18 stitches
Round 4: (2dc in next st, 1dc in each of next 2 sts) 6 times = 24 stitches
Round 5: (2dc in next st, 1dc in each of next 3 sts) 6 times = 30 stitches
Round 6: 1dc in every stitch = 30 stitches
Round 7: (2dc in next st, 1dc in each of next 4 sts) 6 times = 36 stitches
Round 8: 1dc in every stitch = 36 stitches
Round 9: (2dc in next st, 1dc in each of next 5 sts) 6 times = 42 stitches
Round 10: 1dc in every stitch = 42 stitches
Round 11: (2dc in next st, 1dc in each of next 6 sts) 6 times = 48 stitches
Round 12: 1dc in every stitch = 48 stitches
Round 13: (2dc in next st, 1dc in each of next 7 sts) 6 times = 54 stitches
Round 14: 1dc in every stitch = 54 stitches
Round 15: (2dc in next st, 1dc in each of next 8 sts) 6 times = 60 stitches
Rounds 16-17: 1dc in every stitch = 60 stitches
Round 18: (Dc2tog, 1dc in each of next 8 sts) 6 times = 54 stitches
Round 19: 1dc in every stitch = 54 stitches
Start to stuff the head with toy stuffing and continue to stuff as you crochet. This is also a good time to position and insert the eyes. To position the eyes, roughly pin the head patch and mussel on the head, (but do not fix them in place until the head is finished and fully stuffed.) the head patch should be positioned centrally with the eyes either side and the mussel is placed so that the top edge is in line with the centre of the patch.
Round 20: (Dc2tog, 1dc in each of next 7 sts) 6 times = 48 stitches
Round 21: (Dc2tog, 1dc in each of next 6 sts) 6 times = 42 stitches
Round 22: (Dc2tog, 1dc in each of next 5 sts) 6 times = 36 stitches
Round 23: (Dc2tog, 1dc in each of next 4 sts) 6 times = 30 stitches
Round 24: (Dc2tog, 1dc in each of next 3 sts) 6 times = 24 stitches
Round 25: (Dc2tog, 1dc in each of next 2 sts) 6 times = 18 stitches
Round 26: (Dc2tog, 1dc in next st) 6 times = 12 stitches
Round 27: (Dc2tog) 6 times = 6 stitches
Ss in next st and fasten off leaving a long tail of thread to close up with a darning needle. Now the head is fully stuffed you can make small adjustments to the position of the head patch and mussel (put a small amount of toy stuffing into the mussel to give it shape) and stitch them in place. Attach the head to the body by stitching together with darning needle and a piece of Yarn A.
EARS
Using Yarn A. Make 2.
The ears are made with a circular piece that is folded in half to make the curved shape. Start with a magic ring.
Round 1: 6dc into the ring = 6 stitches
Round 2: (2dc in next st) 6 times = 12 stitches
Round 3: (2dc in next st, 1dc in next st) 6 times = 18 stitches
Round 4: (2dc in next st, 1dc in each of next 2 sts) 6 times = 24 stitches
Rounds 5-8: 1dc in every stitch = 24 stitches
Ss in next st and fasten off leaving a long tail of yarn. Fold the ear piece in half and using the tail of thread and a darning needle stitch together the two edges to form the bottom of the ear. Attach both ears to the head with a darning needle and a piece of Yarn A.
ARMS:
Using Yarn A. Make 2.
Stuff as you crochet but stuff lightly, otherwise the arms will look too ridged.
Starting at the tip of the paw, ch7. Once again you will be working around both sides of the chain so your first stitches should be worked into the back loops of the chain.
Round 1: 1dc in the 2nd chain from the hook, 1dc in each of next 4 sts, 3dc in next st, working along opposite side of ch, 1dc in each of next 4 sts, 2dc in next st = 14 stitches
Round 2: 1dc in each of next 6 sts, 3dc in next st, 1dc in each of next 6 sts, 3dc in next st = 18 stitches
Round 3: 1dc in each of next 7 sts, 3dc in next st, 1dc in each of next 8 sts, 3dc in next st, 1dc in next st = 22 stitches
Rounds 4-7: 1dc in every stitch = 22 stitches
Round 8: Dc2tog, 1dc in each of next 20 sts = 21 stitches
Round 9: 1dc in each of next 10 sts, dc2tog, 1dc in each of next 9 sts = 20 stitches
Round 10: Dc2tog, 1dc in ech of next 18 sts = 19 stitches
Round 11: 1dc in each of next 9 sts, dc2tog, 1dc in each of next 8 sts = 18 stitches
Round 12: (Dc2tog, 1dc in each of next 4 sts) 3 times = 15 stitches
Round 13-32: 1dc in every stitch = 15 stitches
Round 33: (Dc2tog, 1dc in each of next 3 sts) 3 times = 12 stitches
Round 34: (Dc2tog, 1dc in each of next 2 sts) 3 times = 9 stitches
Ss in next st and fasten off leaving a long tail of yarn. Close up the top of the arm with a darning needle and then attach to the body.
TAIL
Using Yarn B. Make 1.
Make a magic ring
Round 1: 6dc into the ring, close the ring = 6 stitches
Round 2: (2dc in next st) 6 times = 12 stitches
Round 3: 1dc in every stitch = 12 stitches
Round 4: (2dc in next st, 1dc in next st) 6 times = 18 stitches
Rounds 5-6: 1dc in every stitch = 18 stitches
Round 7: (Dc2tog, 1dc in next st) 6 times = 12 stitches
Ss in next st and fasten off. Stuff lightly and then sew onto the body.
CURLY FUR
Using Yarn B.
The curly fur on the top of the head and around the neck is made using loops of 6 chain stitches. Start with a slip knot on your hook. Insert your hook under the stitch you wish to start adding 'fur' to, catch the yarn you are working with and pull through the loop on your hook to make your first chain. Chain a further 5 stitches and then insert your hook under a different stitch, (close to where you started) catch the yarn and pull through completing the first loop of chain stitches and starting the next. Continue like this until you have covered the required area with curly fur. When you have finished, fasten off.
BEE BODIES
Using Yarns C, and E. Make 3.
Due to their size the bee bodies are made by placing dc's in the back loop of each stitch. Starting with Yarn E, make a magic ring
Round 1: 5dc into the ring, close the ring = 5 stitches
Round 2: (2dc in next st) 5 times. Change to Yarn C as you complete last stitch of this round = 10 stitches
Round 3: In Yarn C, 1dc in every stitch. Change to Yarn E as you complete last stitch of the round = 10 stitches
Round 4: In Yarn E, 1dc in every stitch. Change to Yarn C as you complete last stitch of the round = 10 stitches
Round 5: In Yarn C, 1dc in every stitch. Change to Yarn E as you complete last stitch of the round = 10 stitches
Round 6: In Yarn E, 1dc in every stitch = 10 stitches
Stuff lightly
Round 7: (Dc2tog) 5 times = 5 stitches
Ss in next st and fasten off.
BEE WINGS
Using Yarn D. Make 6.
Make a magic ring.
Round 1: 5dc into the ring. Close the ring.
Ss in next st and fasten off leaving a tail of yarn so that you can attach the wings to the bee's body.
HONEYCOMB
Make 6.
The honey comb is made using 6 small hexagons.
Start by making a magic ring in Yarn E.
Round 1: Ch2 (counts as first stitch) 1htr into the ring, ch1, (2htr into the ring, ch1) 5 times. Ss into the top chain of the ch2 made at the start. Close the ring and fasten off.
To make up the honeycomb: stitch together (using a darning needle and extra thread) 3 hexagons so that they make a sort of triangular shape. Do this again with the remaining 3 hexagons. Place the two groups together so that the wrong sides are touching, and the right sides are facing outwards. Stitch together around the edge.
Related Products