Sunny the Seahorse Crochet Pattern
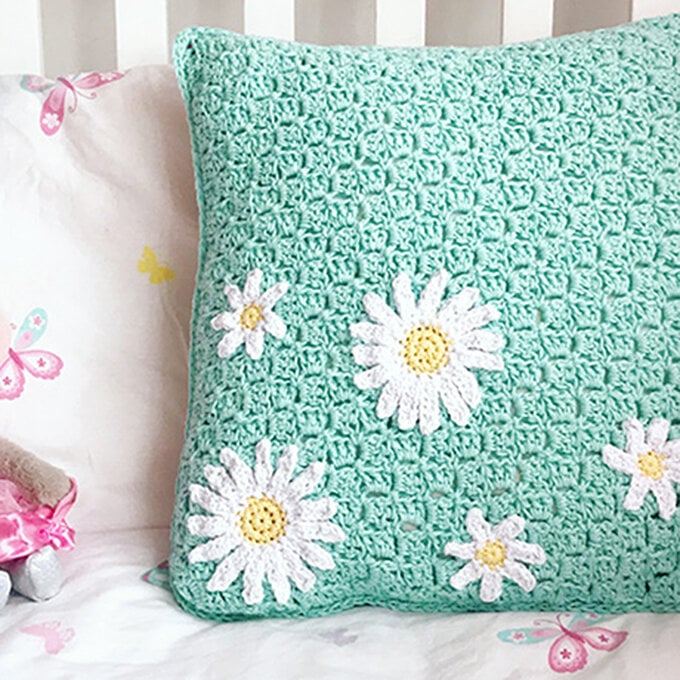
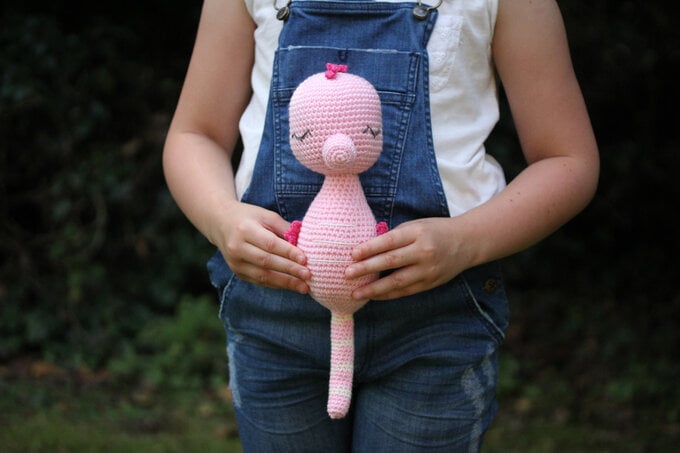
We're loving all things 'under the sea' right now, with summer in full swing, so we were in love when Alison from Kornflake Stew decided to make us this little fellow – say hello to Sunny the Seahorse!
Pattern and photography by Alison North, owner of Kornflake Stew.
You will need
Subtotal
Is FREE

Subtotal
Is N/A
Subtotal
Is $ 3.49
Subtotal
Is $ 6.49
Out of stock

Subtotal
Is $ 6.49
Subtotal
Is $ 6.49
Subtotal
Is $ 2.49
How to make
Abbreviations:
This pattern includes step by step instructions in British terminology.
Dc – double crochet
Htr – half treble crochet
Tr – treble Ch – chain
Sl St – slip stitch 2-dc
inc – Increase stitch 2-dc
inv dec – Decrease stitch
Rep – repeat
Always move your stitch marker up at the end of each row as you will be working in continuous rounds. Stitch count is in ( ) at the end of each row.
Please read through the entire pattern before you begin.
Insert hook in next st, yo and draw through all loops. Double crochet Insert hook in next st and draw up a loop (2 loops on hook), yo, draw through both loops on hook.
First make a loop with your yarn leaving 3? long tail. Insert hook in centre of loop made, yo and draw up loop. YO, pull through to make your first chain. (Do not count this as your first dc) Continue to crochet over the loop and the yarn tail until you have the required number of dc for your first round. For example, if the pattern calls for 6 dcs, then dc 6 times into the ring. (Insert hook into the centre of the ring and draw up loop, YO and draw through both loops.) When you're finished, pull the tail to close the ring.
Please note that when making the invisible decrease you will be working in the front loops only of your two stitches.
Insert your hook into the front loop only of the first stitch. Do not yarn over and pull up yarnas you would in a traditional decrease. Insert your hook into the front loop only of the next stitch. You will need to turn the tip of your crochet hook downward to do this. Then swing your crochet hook up, and under the front loop of the 2nd stitch. You now have 3 loops on your hook. Yarn over and pull the yarn through the first 2 loops on your crochet hook, leaving 2 loops on your hook. Then yarn over again and pull yarn through the last 2 loops on your crochet hook.
Using main colour
1. 6dc in the magic circle, tighten the loop and place marker (6)
2. [ 2-dc inc ] rep (12)
3. [ dc x 1, 2-dc inc ] rep (18)
4. [ dc x 2, 2-dc inc ] rep (24)
5. [ dc x 3, 2-dc inc ] rep (30)
6. [ dc x 4, 2-dc inc ] rep (36)
7. [ dc x 5, 2-dc inc ] rep (42)
8. [ dc x 6, 2-dc inc ] rep (48)
9. [ dc x 7, 2-dc inc ] rep (54)
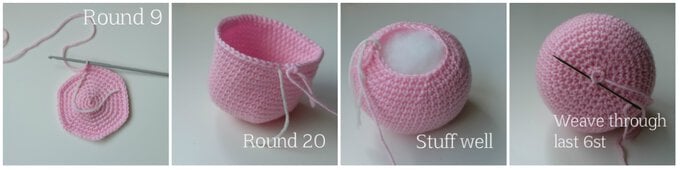
10-20. [ dc in each st around ] (54)
21. [ dc x 7, 2-dc inv dec ] rep (48)
22. [ dc x 6, 2-dc inv dec ] rep (42)
23. [ dc x 5, 2-dc inv dec ] rep (36)
24. [ dc x 4, 2-dc inv dec ] rep (30) Begin to stuff well. Continue to add more stuffing as you decrease making sure the head is nice and firm.
25. [ dc x 3, 2-dc inv dec ] rep (24)
26. [ dc x 2, 2-dc inv dec ] rep (18)
27. [ dc x 1, 2-dc inv dec ] rep (12)
28. [ 2-dc inv dec ] rep (6)
Sl st into the next stitch to finish off, weave through the last 6 stitches and pull tight to close the hole. Make a double knot and hide your yarn tail inside the head.
1. 6dc in the magic circle, pull tight and place marker (6)
2. [ 2-dc inc ] rep (12)
3. [ dc x 1, 2-dc inc ] rep (18) IN BACK LOOPS ONLY
4. [ dc in each st around ] (18) BACK TO BOTH LOOPS
5-6. [ dc in each st around ] (18)
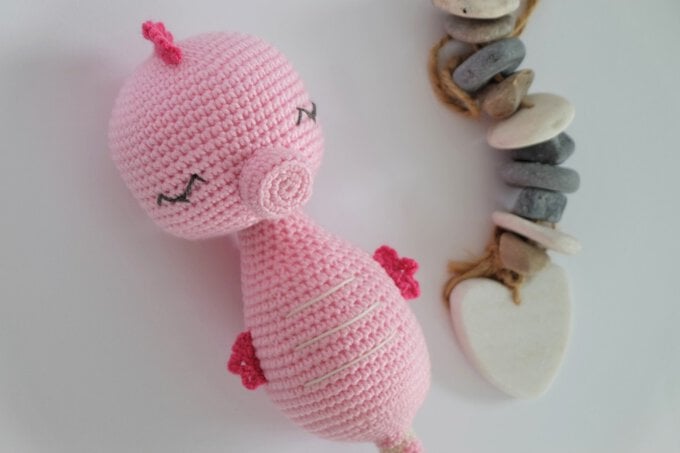
Sl st into the next st to finish off leaving a long tail. Stuff the nose and pin to the head between rows 18-22. Sew in place.
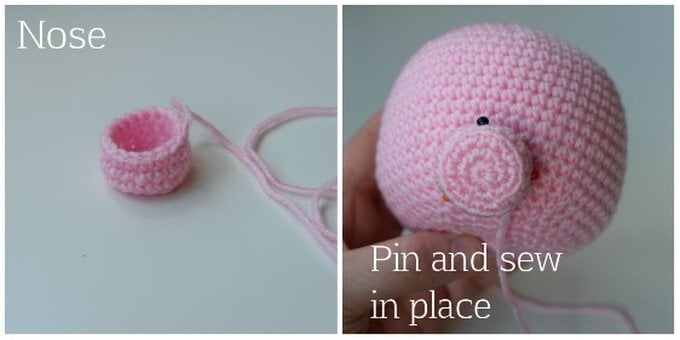
Take a length of yarn/embroidery cotton and embroider the eyes between rows 16-17. Make your eye around 4 stitches wide and leave a tail of yarn hanging out. Hold the tail in place while you make your next stitch to prevent it from pulling out. To make the eye lashes pull down the main stitch in the middle and make a smaller eye lash stitch, make another stitch at each corner of the eye for the 2nd and 3rd eye lashes bringing your needle out at the beginning (where you left your tail hanging out) make a double knot using both tails of yarn and hide the tails inside the head.

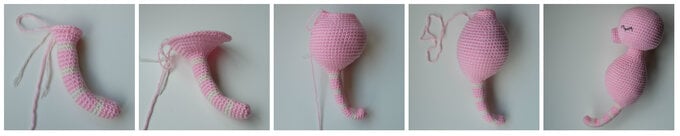
Starting at the tail and using your main colour
1. 6dc in the magic circle, tighten the loop and place marker. (6)
2. [ 2-dc inc ] rep (12)
3-5. [ dc in each st ] (12) Change to stripe colour
6-7. [ dc in each st ] (12) Change to main colour
8-11. [ dc in each st ] (12) Change to stripe colour
12-13. [ dc in each st ] (12)
Change to main colour
14-17. [ dc in each st ] (12) Change to stripe colour
18-19. [ dc in each st ] (12) Change to main colour
20-23. [ dc in each st ] (12) Change to stripe colour
24-25. [ dc in each st ] (12) Change to main colour
6-27 [ dc in each st ] (12)
28. [ dc x 1, 2-dc inc ] rep (18)
29. [ dc x 2, 2-dc inc ] rep (24)
30. [ dc x 3, 2-dc inc ] rep (30)
31. [ dc x 4, 2-dc inc] rep (36) Stuff the tail very lightly
32. [ dc x 15, 2-dc inc x 6, dc x 15 ] (42)
33. [ dc in each st ] (42)
34. [ dc x 18, 2-dc inc x 6, dc x 18 ] (48)
35-42. [ dc in each st around ] (48)
43. [ dc x 6, 2-dc inv dec ] rep (42)
44. [ dc in each st ] (42)
45. [ dc x 5, 2-dc inv dec ] rep (36)
46. [ dc in each st ] (36)
47. [ dc x 4, 2-dc inv dec ] rep (30)
48. [ dc in each st ] (30)
Begin to stuff firmly, keep adding stuffing as you continue to decrease
49. [ dc x 3, 2-dc inv dec] rep (24)
50. [ dc in each st] (24)
51. [ dc x 2, 2-dc inv dec ] rep (18)
52-54. [ dc in each st ] (18)
Sl st into the next st to finish off leaving a long tail. Sew the head to the body.
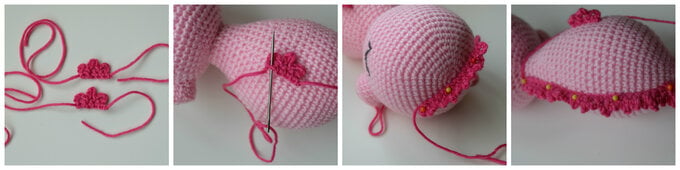
All of the fins are made in the same way. 2 short (sides), 1 medium (head) and 1 long (back). For the side fins
1. Chain 5, dc in the 2nd ch and each ch along, ch 4, turn (4)
2. Sl st into the next st, ch 5, sl st into the next st, ch 4, sl st into the last st.
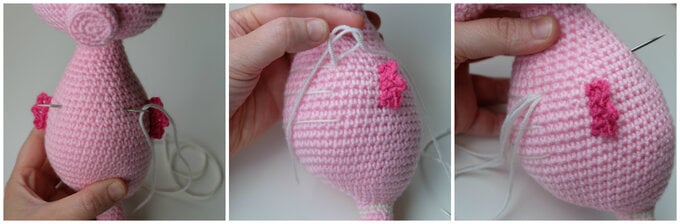
Leave a long tail and sew the fins to the sides of the body. Make the medium fin for the head in the same way but chain 11 and for the back chain 22 Basically dc in each ch along then ch 4, turn. sl st, ch 5, sl st ch 4 until the end. Pin the fins in place and sew securely.
Make 3 large stitches across the tummy using the same colour yarn as you used for the stripes on the tail, secure with a double knot and hide the tails inside the body.
Related Products