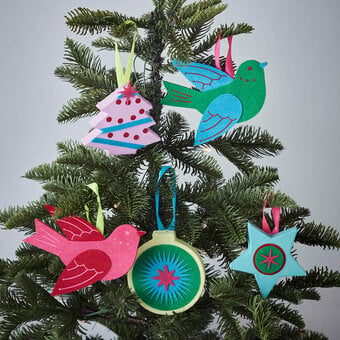
How to Make Clay Christmas Decorations
Create a set of gorgeous handmade clay Christmas decorations inspired by nature and an on-trend colour palette. Use a combination of cookie cutters and the free downloadable templates to build up your unique set!
They'll be perfect for hanging on your tree or to gift to friends and family. It couldn't be simpler, just follow our step-by-step instructions and make beautiful decorations in no time!
Project and instructions by Elizabeth Hardy
You will need


You Will Need
* Air Drying Clay
* Cling Film
* Rolling Pin
* Christmas Themed Cookie Cutters
* Acrylic Paint - Taupe, Pale Pink and Green
* Paintbrushes in Various Sizes
* Glossy Decoupage Medium
* Red Twine
* Small Dish of Water
* Scissors
* Pencil
* Knife
* Sandpaper
How to Make
Before you begin, print and cut out the above templates so they are ready to use.
Prepare your non-stick workspace. You can use cling film wrapped or taped to the surface you are working on.
Cut a section of clay off of the block using a knife and roll out until 1cm thick.
Using a combination of cookie cutters and the printed templates, cut out your desired shapes from the clay. When using the templates, first use a knife or pencil to gently mark the clay around the outside of the template. Then remove the template and use the knife to slowly cut the shape out of the clay. Don't worry if the edges aren't perfect as they will be smoothed down in the next step.


Using the templates as a guide, make a small hole in each decoration with the end of a paintbrush.
Now neaten the edges of your decorations one by one. To do this, pour a small amount of water into a dish, moisten your fingers and gently smooth down the surface of the clay.
Set the decorations aside to dry fully before moving on to the next step. This can take anywhere between 24-72 hours, depending on how warm their environment is.


Once dry, take a small section of fine sandpaper and sand down any large bumps in the clay.
When you are happy with the shape of your decorations, take your base coat colour and apply 2 - 3 coats all over. Leave to dry.


Draw on the details that you'd like to paint onto the decorations lightly in pencil. There are some suggestions within the template, but here you can get creative and decorate however you please!
Paint on the larger blocks of colour with 2-3 coats and leave to dry.
Add in the finer details in contrasting colours. Leave to dry.


Use Mod Podge to seal the decorations, adding a glossy finish.
Once the Mod Podge is fully dry, cut and tie the twine onto your decorations.


Your clay decorations are now ready to hang up!

Craft with us at our workshops


Related Products