Cricut: How to Make a Table Number Sign
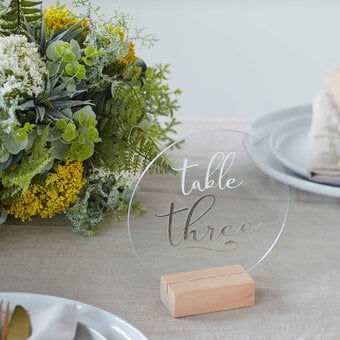
These simple frosted table signs will look stunning at any event.
This step-by-step project will take you through the simple process of applying frosted vinyl to acrylic arch table signs using the wet application method and adding a shimmer vinyl table number to the front.
Cricut Design Space Project Link: Table Number Sign
Please note: This project contains paid-for content from Cricut's Design Space app. Screen reference images are taken from the desktop version of Design Space.
You will need
How to make
* Cricut Maker
* Acrylic Arch Table Signs
* Cricut Opaque Frosted Vinyl
* Cricut Gold Shimmer Vinyl
* Transfer Tape
* Matt Green Acrylic Paint
* Fine Mist Sprayers
* Masking Tape
* A Paint Brush
* Alcohol Wipes

Mask off the acrylic near the wooden base with masking tape and paint in your desired colour.
We mixed a bit of dark green, yellow, pale blue and black to the Pebeo water green acrylic paint to create this sage green.

To open the project in the Cricut Design Space app, follow the link at the top of the post, or alternatively use this link - https://design.cricut.com/landing/project-detail/640266acb96e28345ed13f6f
Cut out a frosted background and table number for each sign you need. Make sure to hide any numbers you don’t need to cut on the layers panel. Cut the arch shape in the frosted vinyl and the writing in the shimmer vinyl.
Weed the vinyl and apply transfer tape. For the shimmer vinyl, use the strong grip transfer tape that comes with the roll.
Top Tip: There is a print and cut template that you can use to help align the vinyl on the sign if you wish to use it.


Using masking tape, attach the print and cut template to the back of the sign.
Apply the wording to the front of the sign.

Move the template to the front of the sign ready to apply the frosted vinyl.
Clean off the sign with an alcohol wipe to get rid of any grease, dust or fingerprints.

Before applying your frosted vinyl, pop a tea towel or kitchen roll onto your work surface.
Fill your water sprayer with water and a small drop of washing up liquid (you don’t need a lot the smallest drop is plenty).
Remove the backing from the vinyl. Hold the water sprayer about a foot away from the vinyl and lightly spray the sticky side with the solution. Apply vinyl to the sign, leaving an even gap around the edge.
Next, using your scraper tool, start from the middle of the vinyl and push out any water/bubbles out from under the edge. Dry gently with a cloth. This is an easy way to avoid so many pesky bubbles when applying your vinyl. Keep going over the vinyl until you can’t see any more bubbles. Leave the transfer tape on until all the water has been pushed out.
Once applied well, remove the transfer tape.
Repeat steps 1-5 for the remaining signs.


