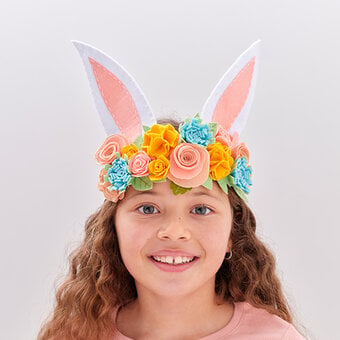
How to Make a Floral Bunny Headband
Level
Intermediate
Time
1/2 day
Budget
<10
Add a little cuteness to your child’s outfit (or even your own!) with this floral bunny headband, perfect for spring and Easter celebrations.
We've used pastel blooms to create the bunny headband in this project, but any blooms can be used to suit your preferred colour scheme.
Project and instructions by Jo Boland
You will need


Step 1

Step 2

Step 3


Step 4

Step 5

Step 6


Step 7

Step 8


Step 9


Step 10

Step 11


Step 12

Step 13


Step 14

Step 15


Step 16


Craft with us at our workshops


Related Products

How to Bake a Minimal Bunny Cake
How to make Ingredients: To Bake: 8oz/250g butter or margarine at room temperature 8oz/250g caster sugar 4 medium eggs 8oz/250g self-raising flour 2 tsp vanilla extract To Decorate: ½ jar raspberry jam Step-1 Preheat oven to 170°C fan/375°F/Gas 5 View ...
Cricut: How to Make a Floral Bunny Headband
You Will Need * Cricut Design Space app installed on a laptop, PC, Tablet, or mobile device * Cricut FabricGrip Mat 12 x 12 Inches * Sewing Kit * Embroidery Needles * Embroidery Scissors * Cricut Washable Fabric Pen * ...

How to Make a Pompom Bunny Bonnet
How to make Step-1 You need to start by making lots of pompoms! Follow the instructions on the pompom maker to take it apart, wind your wool, tie together and cut to create a pom. This technique may differ slightly ...

How to Make a Tiered Floral Cake
How to make You will need: 2 tier cake covered in Renshaw Celebration Ready to Roll icing » (I used 6” and 8” cakes) Wilton Gum-Tex Vodka or other clear alcohol or clear flavour extract Galaxy gold eggs - available ...

How to Make a Floral Scallop Cake
How to make Step 1 Colour 500g of buttercream (or Creamy Decorators Icing) in pastel colours to create your flowers – we used yellow, pink, green and a little blue. View More {{#pagination}} {{/pagination}} Step 2 Using the flower nail ...

How to Make a Bunny Cake
How to make You will need: 7” round cake, covered with White Ready to Roll Icing Dresden Tool Craft Essentials Cocktail Sticks Sharp Knife Fine Paintbrush Water and Brush Step 1 First, make the bunny ears a day or 2 ...