Skip to Content (Press Enter) Skip to Footer (Press Enter)

How to Use a Knitting Machine

Level
Beginner
Time
1 hour
Budget
30+

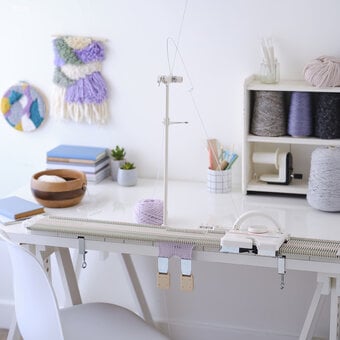
The instruction manual for the Silverreed LK150, is so clear and a real beginners guide explaining everything from start to finish, it explains what it is, what it does, how it works, techniques and making garments. I have below created a little how to guide with some pictures so show you how I went about using the machine.

You will need

Is $ 5.49

Quantity: 1

Subtotal

Is $ 5.49

Is $ 9.49

Quantity: 1

Subtotal

Is $ 9.49

Is $ 619.00

Quantity: 1

Subtotal

Is $ 619.00

Is $ 5.49

Quantity: 1

Subtotal

Is $ 5.49

Out of stock

Is $ 2.49

Quantity: 1

Subtotal

Is $ 2.49

You’ve viewed 2 of 5 products

You’ve viewed 4 of 5 products

Total:

How to make

How to Thread Up the Machine Step-1

The yarn is always placed at the back at the machine, the only time it will ever be at the front is if you are working intarsia, weaving or decorative e wrapping. The yarn as mentioned previously would have been wound already or placed in a yarn bowl.

Step-2
With the yarn at the back, thread up the tension mast; thread the yarn through the eyelet on the right, through the tension dial, the eyelet in line with the dial and then the eyelet at the end of tension arm. The yarn is then taken down to the carriage (on the right of the machine) slipped into position 1 on the carriage and wrapped around the clamp underneath the machine to keep the yarn secure.
how-to-thread-up-the-machine%20%281%29.jpg?sw=680&q=85
Setting the Carriage and Casting On: Step-1

Depending on the yarn that you use will depend upon the tension you will choose on the dial. I am using Women's Institute Premium Acrylic DK yarn and I have found the best tension to work in for this is 4.

Step-2
On the carriage make sure the levers are in the correct place; triangles for the top 2 levers and II for the bottom levers. There are a few methods of casting on the 2 that I will be talking about are e-wrap cast on (neater finished edge) and the carriage cast on.
Step-3
The E-Wrap cast on – making sure your carriage is on the right, you select your needles, working with 0 as the centre part of the knitting, bring them forward to ‘D’ position.
Step-4

Bring the yarn from underneath your carriage and work with the first needle on your left. Taking the yarn in between the last 2 needles and then wrap over the left needle, rep this step – yarn between the next 2 needles, take the yarn over the left and continue until the last st.

Note: Make sure that you have casted on these stitches loosely as it will be difficult for your first row of knitting.

Step-5
Once completed rest the comb on the stitches (not the needles) and holding the comb down with a loose tension take your carriage across slowly, making sure the edge of the carriage passes all your stitches before you return it back to the right-hand side of the knitting machine. Once these 2 rows are done, add the weights to the comb and start knitting. Note – if the carriage feels too tight going across it’s all in the tension so adjust to suit the knitting. Another in regard to the weights you will have to keep readjusting these as you knit to create an even piece of knitting.
The Comb Cast On Step-1

Using the needle selection tool and using 0 as the centre point bring out your needles to work with into 'D' position.

how-to-cast-on-2.jpg?sw=680&q=85
Step-2
Once selected take your carriage across, the yarn will rest over the selected needles, using the comb catch the yarn between the needles and bring the remaining needles into ‘D’ position, now holding the comb return the carriage to the right.
how-to-cast-on-3.jpg?sw=680&q=85
Step-3
Place your weights on evenly and start knitting: Once you have knitted some fabric and got comfortable with the machine you can start using the tools and start to create!
How to Create a Striped Fabric: Step-1

Thread the left hand side of the tension mast and have 2 yarns in action (to work at a similar tension it is best to work with the same weight yarn).

Step-2
On the mast there is a yarn holder to keep the yarn in place so make sure you use this. When you have knitted enough fabric in your colour ‘A’ you can change, at the back of the machine there is a yarn rest, this yarn rest will allow you keep the yarn in place while you knit with the other yarn and to stop you from cutting and having loads of ends to tidy up.
Step-3
Take the main colour out of the feeder and replace with yarn ‘B’, careful that your yarns don’t’ twist, knit until you want to switch and repeat the process until you have finished your stripe.
stripes1.jpg?sw=680&q=85
How to Create Pointelle Fabric (lace holdes) and Ladders:Step-1

With using the transfer tools you simple transfer stitches from one needle to another. (images below)

Step-2
If you wish to create a lace hole you leave the empty needle in ‘D’ position.
Step-3
To create a ladder you completely take the needle out of action back to ‘A’, you can create as big a ladder as you wish. Note: when bringing the needles back into position ‘D’ you must bring them in 1 at a time on either side as the needles will not pick up the yarn as the carriage goes across. (images below)
To Create a Tuck Stitch:Step-1

Tucking creates a little volume in your work and also works great with 2 colours. To start, with the carriage on your right bring the needles you wish to tuck (hold the yarn) into 'D' position and change the levers from II to I (holding) on both sides.

Step-2
If using a 2nd colour place it in the yarn feeder and rest the main colour in the yarn rest at the back of the machine.
Step-3

Take your carriage across and what you will notice is that your 2nd colour has knitted the needles in ‘B’ position and laid over the needles on I, knit for a further 3 rows and return your main colour into the feeder and rest 2nd colour at the back, move the levers back to II on both sides and knit 2 rows.

Note: you must remember where you had your needles out into tuck position if you want to repeat the pattern so have a pen and paper ready.

Step-4
You repeat this process for however long you would like your fabric to be. Note: take note of the tension and watch the weight of the fabric too as if you do many rows for the tuck fabric the working needles may drop their stitches.
How to Cast Off: Step-1

Once you have finished your knitting you are ready to cast off. Make sure the carriage is on the right hand side and that you have the single transfer tool in hand.

Step-2
* Using the tool, take the right hand stitch on the needle to the needle on the left, bring the needle completely out (with the 2 stitches at the back of the needle). (images below)
Step-3
Taking the yarn from underneath the carriage lay it in on the needle and close the latch, with your thumb take the needle back. The yarn in the latch will then knit those 2 stitches together as one. * (images below)
Step-4

Repeating from * to* until the last stitch where you break the yarn, thread through the last stitch, fasten and secure. (images below)

Related Products

  • bvseo_sdk, dw_cartridge, 18.2.0, p_sdk_3.2.0
  • CLOUD, getReviews, 17ms
  • reviews, product
  • bvseo-msg: Unsuccessful GET. status = 'ERROR', msg = 'Not Found.'; Unsuccessful GET. status = 'ERROR', msg = 'Not Found.';
Top