How to Make a Latch Hook Cushion
Add a touch of cowboy core to your home with this tutorial for a cow print latch hook cushion. Once you have learnt the simple technique of latch hook you will love working up this fun design.
After you fall in love with latch hook, you can easily create your own chart to make a rodeo inspired collection!
Tutorial by Artisan Emily Platt @lostinknit
You will need


How to make
* WI Soft and Chunky in Cream x 2
* WI Soft and Chunky in Black x 2
* Latch Hook Tool
* Latch Hook Canvas 4 Count
* Cushion Backing 45cm x 45cm
* Cushion Pad 40cm x 40cm
* Darning Needle
* Sewing Needle
* Sewing Thread
* Pins
* Scissors


Begin by cutting your canvas to the correct size. Count the squares on the chart and add 5 squares to each side. Cut off the excess canvas. You will be working on the parallel horizontal threads and not the twisted vertical threads so make sure the canvas is the correct way before cutting your canvas.

With your card, cut a template to help you cut the yarn. Cut a strip of card 7cm wide and fold in half.
Start wrapping the yarn around the card until it is full. Take your scissors and insert them in between the folded card and cut the yarn.
Top tip: You can either cut a lot of yarn at the start in each colour or create more as you go. Make sure you only wrap one layer of yarn over the cardboard so that each piece of yarn is the same length.


Now begin to latch hook.
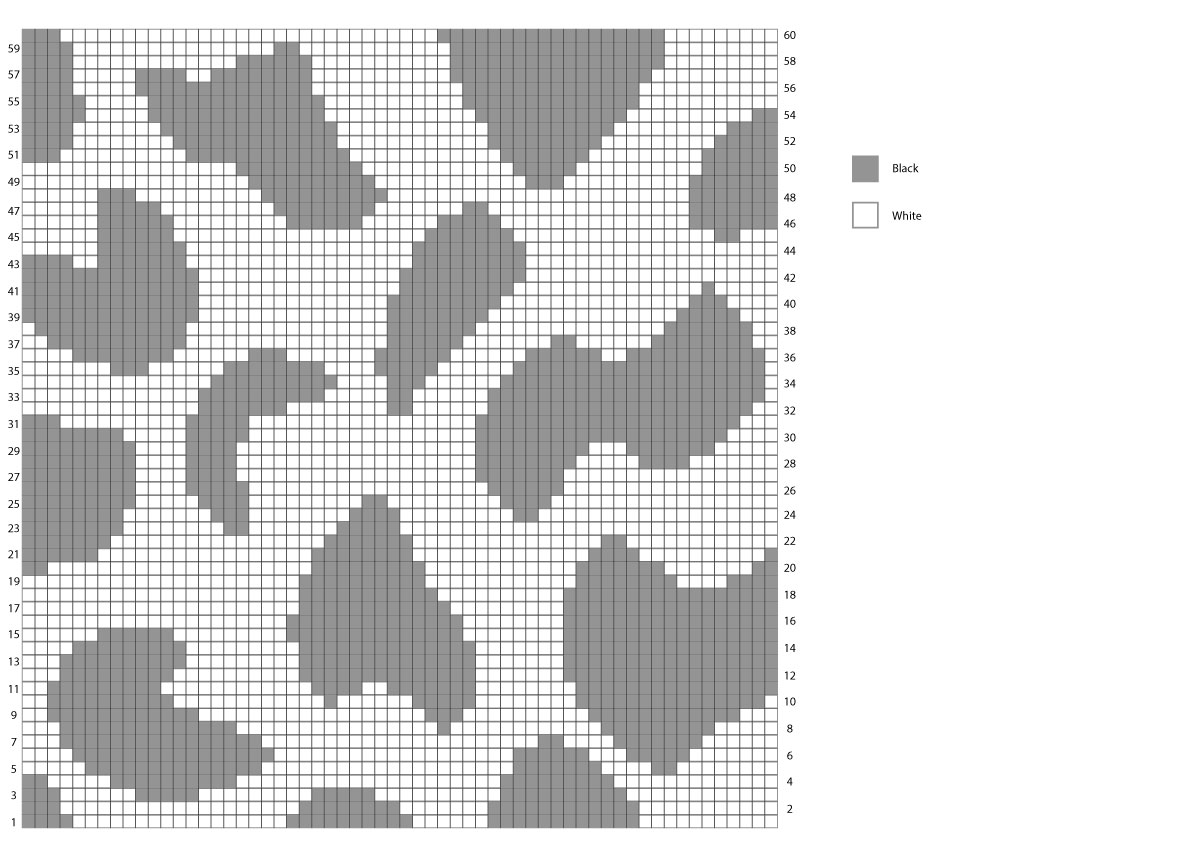
Working on the parallel horizontal lines, start following the chart from the bottom left or right-hand corner depending on your preference.
Each square on the chart represents one knot on the grid. Make sure to count 5 squares in from the bottom and the side, this will be your first square.
Wrap one length of yarn around the metal part of the latch hook near the handle. Hold both ends of the yarn, keeping them together.
Insert the hook under a horizontal line of the canvas. Push the latch hook through so that the latch has gone through. Make sure the latch is open.
Wrap the yarn around the top of the latch hook. Without letting go of the ends, pull the latch hook back through the canvas. The latch will close and the yarn will be in the hook.
Pull the yarn through and secure the knot by gently pulling both ends.
Continue working along each row by following the chart and changing colour when indicated.


Once the chart is complete, it’s now time to sew it to the cushion backing.
Begin by opening the zip on the cushion backing.
With right sides together, begin pinning the 2 pieces together, making sure to keep any yarn away from the seam and inside.
Once you have pinned around each side, cut off any excess canvas.
Now begin to sew the pieces together. You can either use a sewing machine or hand sew around the edgings.
You want to stitch as close to the edge of the latch hook section as possible.
When you have finished, trim any excess fabric and turn right side out.
Now is the time to tidy up any longer bits of yarn by trimming them down.
Add your cushion pad and close the zip. You are finished!


Craft with us at our workshops


Related Products


