Digital Cutting & Crafting Ideas
Discover digital crafting projects for transforming your home décor, creating custom clothing, personalising handmade gifts and much more! From craft inspiration for Silhouette and Cricut machines to ideas for your Glowforge laser cutter or Sawgrass sublimation printer, there are so many ways to create. Achieve a professional finish every time as you bring digital designs to life.
Skip to Product Grid (Press Enter)
Filters
- Birthday (5)
- Christmas (67)
- Newborn Baby (12)
- Summer (12)
- Spring (9)
- Ramadan (3)
- Advent (3)
- View more
- Thank You (3)
- Wedding (18)
- Party (14)
- Halloween (12)
- Valentine's Day (9)
- Autumn (5)
- Mother's Day (4)
- Pride (4)
- Father's Day (3)
- Black History Month (2)
- Sport Events (2)
- Diwali (1)
- Earth Day (1)
- Eid (1)
- Hanukkah (1)
- St David's Day (1)
- St Patrick's Day (1)
- Winter (1)
- Easter (23)
- Platinum Jubilee (1)
- Art - Mixed Media (1)
- Cricut (1)
- Cricut - Other (32)
- Cricut - Papercraft (91)
- Cricut - Sewing (12)
- Cricut - Vinyl (86)
- Decor & Hobbies - Other (2)
- View more
- Digital Crafting - Laser Cutting (25)
- Digital Crafting - Sawgrass (1)
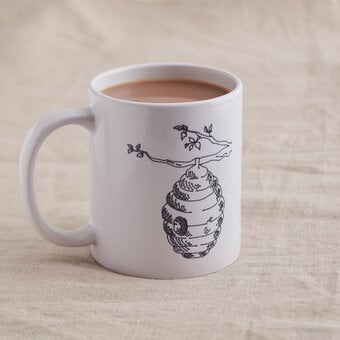
- Digital Crafting - Sublimation (92)
- Occasions - Party (1)
- Sewing - Fat Quarter Projects (1)
- Weddings - Decorations (2)
Viewing 1 - 48 of 361 Ideas
Viewing 1 - 48 of 361 Ideas


.jpg?sw=340&q=85)


You've viewed 48 of 361 products
Related Products
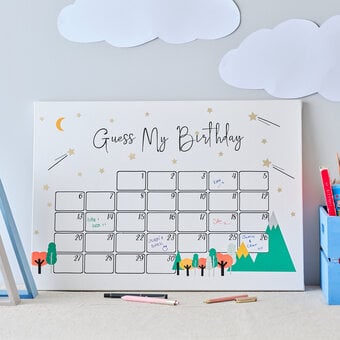
Cricut: DIY Birthday Guessing Game
You will also need: * Laptop or tablet with Cricut Design app installed Step 1 To begin with paint your canvas board with white paint – this will help the vinyl grip better to the fibres on the canvas. View ...

Cricut: How to Make an Easter Doormat
You Will Need * Cricut Explore * Cricut Basic Pastel Tool Set 5 Pack * Cricut Brayer and Remover Set * Masking Tape 21mm x 20m * Stencil Brushes * Cricut Mint Permanent Smart Vinyl 13 x 36 Inches * ...

Cricut: How to Make Celebration Bunting
Project & Instructions by Hobbycraft Artisan: Becky Wallace Find out more. You Will Need * Cricut Machine * Cricut EasyPress * Canvas Bunting * Black PU Iron-On Vinyl * Tassel Maker * Pom Pom Maker 4 Pack * Yarn Hand ...
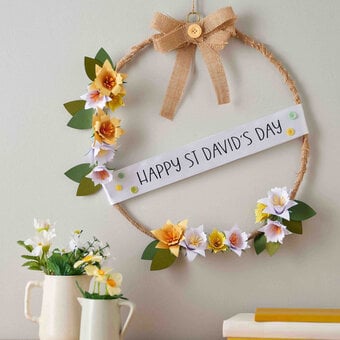
Cricut: How to Make a Paper Daffodil Wreath
Project and instructions by Hobbycraft Artisan: Emma Taylor Find out more. You Will Need * Cricut Machine * Cricut LightGrip Cutting Mat * Cricut Basic Tools * Glue Gun * Coloured Card * Twine * Hessian Roll * Hanging Hoops ...
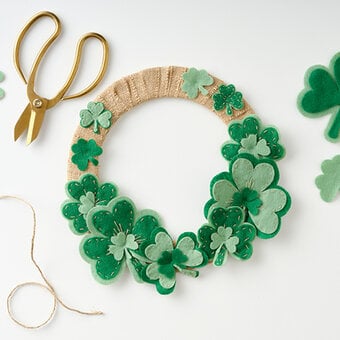
Cricut: How to Make a St Patrick's Day Wreath
You will also need - * Cricut Design Space app installed on a laptop, PC, Tablet or mobile device Step 1 Open Cricut Design Space and select ‘Start New Project’. Once through to the Canvas screen, select 'Images' at the ...

Cricut: How to Make Personalised Party Signs
Project and instructions by Hobbycraft Artisan: Becky Wallace Find out more. How to Make You Will Need 'Yay' Sign * Cricut Machine * Basic Cricut Tools * Clear Round Acrylic Sign * Cricut Permanent Gloss Vinyl - Pastel and Tomato ...
Oops...
Sorry, we did not find any products that match the
selected filters. You can go back to previous results to
select something different.