How to Make Animal Peg Dolls
Celebrate the birthday of Sir David Attenborough with this collection of magnificent animal peg dolls! Create bright and engaging animal dolls that kids will love. It couldn't be easier with our free templates.
Follow along with the instructions below to find out how to make your own peg dolls. Why not get creative and make other animals to add to your collection?
Project and instructions by Caroline Shard
You will need


* White Card
* Acrylic Paints
* White Gesso
* Wooden Peg Dolls
* Tacky Glue
* Scissors
* Paintbrushes
* A Pencil
* Paint Markers (optional)

Download the PDF template here
Download the below JPEG files to use in Design Space and cut the templates using your digital cutting machine:

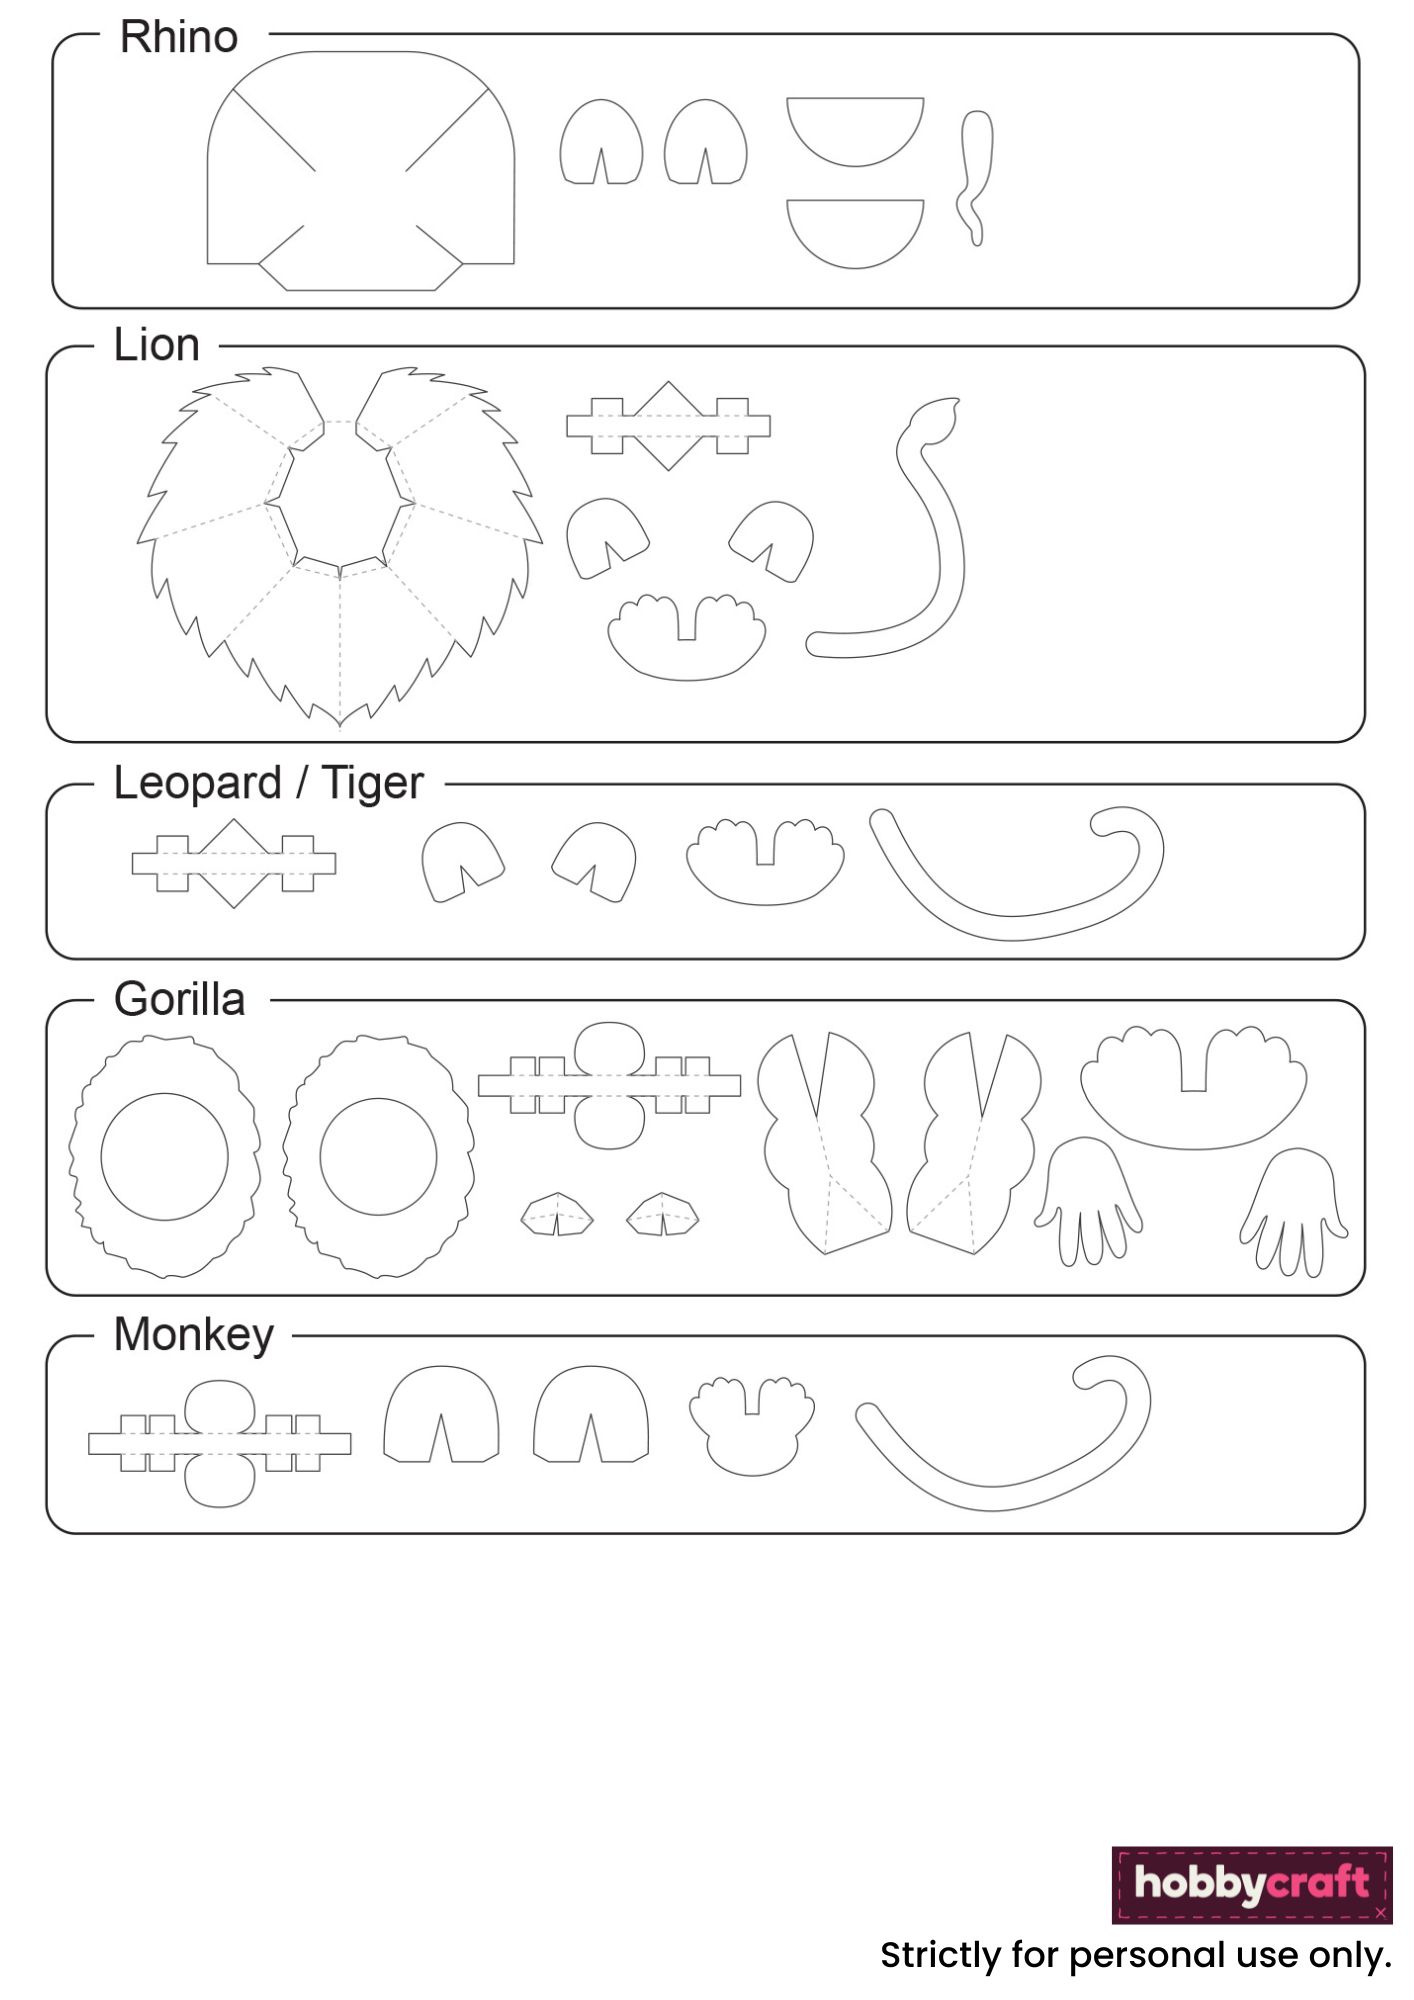
Print and cut out the template shapes, trace them onto your card and cut them out.
Tip: To keep track of the animal parts, use a pencil to lightly write on each of the card pieces as a reminder.

Using tacky glue, stick each piece to the wooden peg dolls one by one. Some pieces may need to be carefully held down for a few seconds to stay in place.

Firstly, attach both ears to the back of the dolls head. As they're held in place curve them slightly round the side of the head so they're less flat.
Next attach the tusks onto the top section, attach the trunk on top of the tusks and add the tail on the back.

Construct the ossicones (the skin-covered bones on the giraffe's head) by folding along the dotted lines and gluing the top and sides together to create a pyramid shape. Once dry glue this to the top of the dolls head.
Add a small dab of glue to the bottom of each of the ears and curve the pieces either side of the triangle groove to curve them round and stick together.
Attach the face piece onto the head. Then, once the ears are dry, position them and attach them to the top of the head.
Next add the tail to the top of the back of the doll - remember giraffes have long legs, so this will look more realistic being higher up! Once dry, carefully add a line of glue down the inside edge of the mane piece and hold this in place on the back of the doll (curving round the back of the head until it stays in place). Don't worry if there's a small gap, the glue and paint should fill this.

Add a small dab of glue to the bottom of each of the ears and curve the pieces either side of the triangle groove to curve them round and stick together.
While these dry, attach the face to the front and the tail to the back of the doll. Once the ears are dry, position them and glue them to the top of the head.
Run a line of glue down the inside edge of both of the mane pieces, attach these around the back of the doll, curving round the back of the head, leaving a small gap between them. Hold until each one remains in place, this may be easier to do one at a time.

Cut along the lines of the large head piece and overlap the card each side of these cuts. As these overlap they should form a nose and head for the rhino. Position the piece over the doll base while forming the shape to help create less gaps when the pieces meet. Glue the overlapped parts in place and then attach onto the head of the doll.
Add a small dab of glue to the bottom of each of the ears and curve the pieces either side of the triangle groove to curve around them and stick together. Once the ears are dry, position them and glue them to the top of the head.
The two semi circles are the horns, roll each one up to form a cone shape and glue. Once dry, trim any excess from the bottom of the horn so they are flat, then stick to the flat part of the headpiece.
Finally, add the tail to the back.

Fold along the dotted lines of the mane, try to keep these as clean and sharp as possible. Wrap the mane around the head of the doll and overlap the top of the edges so it becomes slightly cone shaped. Glue the overlapping section and the tabs on the inside of the mane down onto the neck (so they are hidden under the mane). Hold in place until this remains in position.
Fold the dotted lines on the nose piece to create a 3D triangle and glue together. Add a small dab of glue to the bottom of each of the ears and curve the pieces either side of the triangle groove to curve them round and stick together. Once both elements are dry, attach the ears to the front of the head up against the mane and the nose in the centre of the face.
Add the tail onto the back of the doll and the feet onto the bottom of the doll base.

Fold the dotted lines on the nose piece to create a 3D triangle and glue together. Add a small dab of glue to the bottom of each of the ears and curve the pieces either side of the triangle groove to curve them round and stick together. Once both elements are dry, attach the ears to the head and the nose to the centre of the face.
Add the tail onto the back of the doll and the feet onto the bottom of the doll base.

Attach the mane-like pieces either side of the dolls head, they should attach to each other at the top and to the doll base at the bottom.
Fold the dotted lines on the nose piece to create a 3D oval and glue together.
Carefully fold the dotted lines on the eyebrows and curve the pieces either side of the triangle groove to create a gentle mountain shape. Add a small dab of glue to the bottom of each of these and stick them together. Once dry attach the eyebrows to the face, along with the nose.
Fold along the dotted lines of the arms and add a small dab of glue to each side of the triangle grooves, curve them round and hold until they remain stuck. Once dry, add glue to the edges of each arm and attach to each side of the body curving to the front slightly at the bottom. Once dry, glue the hands to the bottom of the arms and curve to mimic a gorilla walking on its knuckles.
Attach the feet to the bottom of the doll base.

Fold the dotted lines on the nose piece to create a 3D oval and glue together. Add a small dab of glue to the bottom of each of the ears and curve the pieces either side of the triangle groove to curve them round and stick together.
Once dry, attach the ears to either side of the head and the nose to the front of the face.
Attach the feet to the bottom of the doll base and the tail to the back.

Fold along the dotted lines of the large body piece and overlap the card either side of the triangular grooves. Put the doll on its side and position this onto the body so the tail sits comfortably on the flat surface. Glue this piece in place.
Fold along the dotted lines of both sets of teeth pieces and overlap the card either side of the small cut marks. These will now bend round to fit the shape of the head pieces. Glue each set of the head and teeth pieces together so they form a separate top and bottom jaw. Once dry, attach these to the head of the doll, attaching the top jaw slightly further forward than the bottom one.
Next, position both sets of feet underneath the body, then glue in place.
Take the two eye pieces (look like mushrooms) and fold along the dotted line. The small semi-circle is going to be the front of the eye, so keeping that side flat, curve the larger side around and glue into a quarter-sphere shape. Once dry, position and glue these onto each side of the head piece making sure the flat side is facing outwards.
Lastly, add the the spines for extra texture. Fold along the dotted lines and add these onto the back and along the tail of the crocodile. Add lots or just a few and trim pieces to fit where they've been positioned, glue these in place.

Position the hair piece around the head of the doll, it will curve slightly, then add a line of glue around the inside edge to stick to the head - hold this in place until it's firmly stuck.
Cut a small snip into the inside of each ear and glue as per the animal ears to get a more curved shape. Once dry, attach on each side of the face in front of the hair.
Curve the collar around the neck leaving the two ends at the front and glue in place.
Fold along the dotted lines of each of the arm pieces and overlap the card either side of all the triangular grooves. The top part will curve to create shoulders and the side bend will create a curved arm. Glue these together in place and, once dry, attach to either side of the body.
Glue the hands just underneath the bottom of each of the sleeves and add the feet to the bottom of the doll base.

Once the glue is dry, cover the whole figure in white Gesso. This will help to get a consistent colour over the whole doll.


Once the base coat of each figure is dry, start adding simple details in block colours. Paint tusks and feet on the elephant in a lighter colour, the mane on the lion, the teeth and mouth of the crocodile and hair and clothes on Sir David Attenborough.


Keep adding details to each of the figures. Spots, stripes, noses, ears, fur and hair can all be painted to stand out.
Tip: Look up real photos of animals and see what different patterns, colours and textures they have that can be added to the figures.


Lastly, add some fine details to the dolls. Make sure they have eyes, nostrils, whiskers, hands and paws. Don't forget to paint the bottom of the figures too!
Add some simple stitch lines and buttons to Sir David Attenborough's shirt and trousers. Finish his face with a nice, big smile.


Craft with us at our workshops


Related Products


