How to Make an Air Dry Clay Christmas Gnome
Level
Intermediate
Time
1/2 day
Budget
10 - 30
This adorable Christmas gnome is fun to make and will bring joy to your Christmas decor this year. Using air drying clay and some simple paints you can create this cute little figure.
Why not make several in different sizes and set them on your mantlepiece for a bright, festive display.
Project and instructions by Hobbycraft Artisan:
You will need


How To Make
You Will Need
* White Air Drying Clay
* Acrylic Paint - Green, Red, White and a Skin Tone Colour of Your Choice
* Paintbrushes
* Knife
* Toothpick or a Pencil
* Bowl of Water
* Rolling Pin or a Glass
Craft with us at our workshops


Related Products

How to Make an Air Dry Clay Castle
How to make You will also need: *Cocktail sticks *Sandpaper *Scissors *A ruler *A rolling pin *A paint brush *A piece of paper *Cling film *Anything you'd like to decorate with (e.g. glitter glue) Step 1 On a piece of ...
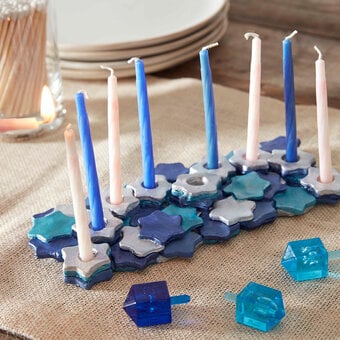
How to Make a Menorah from Air Drying Clay
Step 1 Prepare a flat wooden or cardboard surface and make sure that you have a cup of water handy. Open the Das pack and take out a quarter of it. Using the rolling pin, roll out a rectangle of ...

How to Make Air Dry Clay Heart Bowls
Broken step image Step-1 Start by rolling out the air dry clay until it's the thickness of a one pound coin. View More Step-2 Using cookie cutters cut hearts from the clay and leave to dry in a bowl, or ...

How to Make Clay Wall Hangings
How to make Step-1 Take roughly 500g grams of clay in either colour and roll out until 2cm thick using the rolling pin. View More Step-2 Print and cut out the template, place onto the rolled out clay and carefully ...

How to Make Clay Mushrooms
This fantastic mushroom air drying clay project is a great way to enjoy some box frame DIY, helping you transform simple craft materials into an eye-catching work of art. It’ll make a great gift or a fun project for little ...
.jpg?sw=340&q=85)
How to Make Printed Clay Coasters
How to make Step-1 Cut the 1kg White Air Drying Clay block into thirds. View More {{#pagination}} {{/pagination}} Step-2 Roll out the clay with a rolling pin to a 1.5 cm thickness. View More Step-3 Print into the clay using ...