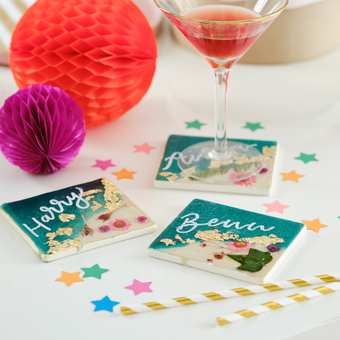
Glowforge: How to Make Personalised Ceramic Coasters
Learn how to create super-simple, on-trend, engraved coasters using the Glowforge laser machine – an ideal project for Glowforge beginners!
Whether you’re looking for your next home décor project, personalised favours for your wedding day or your next idea for your small business, these quick-to-make ceramic coasters are sure to delight any lucky recipient.
Project and instructions by Aisha Cluitt and Hobbycraft Artisan Chrissie Ellson
Please note: This project contains paid-for content from the Glowforge image and font library. Screen reference images are taken from the desktop version of the Glowforge design software.
Due to the handmade nature of the coasters, you may wish to lightly sand the right side of the coasters to remove any uneven patches. Make sure all dust is removed from the surface before placing the coasters into the Glowforge.
You will need


How to make
You will also need:
* Sandpaper (optional)
Switch the Glowforge on and connect to the machine on your desktop or laptop.
Place the ceramic coasters into the machine with the right-side facing up.
Start a new project within the design software and add your chosen greeting/message - we’ve used the Bold ‘Alegreya SC’ font. Resize the text as desired making sure it fits comfortably on the top of each coaster.
Top Tip: If you’d like the font size to be consistent across all the coasters, resize the longest name/phrase first, once happy with the size, make a note of the font size and apply this to the text on the other coasters.
Place the elements on top of the on-screen coasters (the Glowforge will have scanned these after they had been placed into the machine); the Glowforge will add the text on to the coasters where it is positioned on screen, so make sure you have the text exactly where you want it!

Within each of the design elements down the left-hand side of the screen set each of the elements to ‘Engrave’, the text will then turn a solid blue colour.
As the material that is being cut is not a Glowforge proofgrade material the settings will need to be manually added. We used the following settings to engrave our coasters –
Base Setting = Medium Acrylic
Speed = 1000
Power = Full
Lines per cm = 105
Number of Passes = Two
Select ‘Print’, then press the flashing go button on the machine when prompted. The machine will then start work on your design.


While the machine is working, a progress pop-up will appear on screen featuring a count-down timer of how long is left until completion.
Once complete wait for a prompt to display on screen before lifting the machine lid and removing the item/s.


The coasters are then ready to be used!
Top Tip: to ensure the coasters withstand daily use Modpodge to seal the design. Leave the sealant to dry completely before using.


Craft with us at our workshops


Related Products