Your Cricut Explore: Upcycled Wall Art
Level
Beginner
Time
1 hour
Budget
<10
Adorn your craft space with handmade upcycled wall art in all the colours of the rainbow with this colourful make. Using a Cricut machine and Design Space, you'll have this hanging in pride of place in next to no time!
You will need


How to make
You will also need:
Wood off-cut
Step-1

Step-2

Step-3

Step-4

Step-5

Step-6

Step-7
Step-8
Step-9
Step-10
Step-11

Craft with us at our workshops


Related Products

Cricut: How to Make Celebration Bunting
Project & Instructions by Hobbycraft Artisan: Becky Wallace Find out more. How to Make You Will Need * Cricut Machine * Cricut EasyPress * Canvas Bunting * Black PU Iron-On Vinyl * Tassel Maker * Pom Pom Maker 4 Pack ...

Cricut: How to Make an Easter Doormat
How To Make You Will Need * Cricut Explore * Cricut Basic Pastel Tool Set 5 Pack * Cricut Brayer and Remover Set * Masking Tape 21mm x 20m * Stencil Brushes * Cricut Mint Permanent Smart Vinyl 13 x ...

Cricut: How to Make a Personalised Family Plaque
Project and instructions by Hobbycraft Artisan: Vicky Boyns Find out more. You Will Need * Cricut Machine * Cricut LightGrip Cutting Mat * Basic Cricut Tools * Transfer Tape * Cricut Premium White Vinyl * Wooden Chopping Board * Masking ...
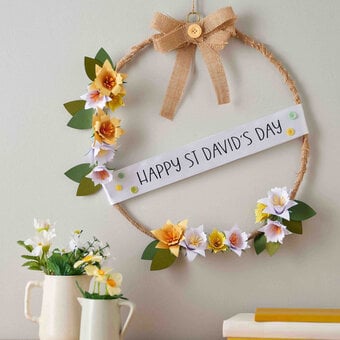
Cricut: How to Make a Paper Daffodil Wreath
Project and instructions by Hobbycraft Artisan: Emma Taylor Find out more. How To Make You Will Need * Cricut Machine * Cricut LightGrip Cutting Mat * Cricut Basic Tools * Glue Gun * Coloured Card * Twine * Hessian Roll ...

How to Make an Iftaar Time Frame
How To Make You Will Need * Cricut Joy * Cricut Joy Large StandardGrip Mat * Cricut Joy Starter Tool Set * Cricut Joy Kelly Green Permanent Vinyl * Transfer Tape * Cardstock - Yellow and Gold * Magnetic Hinge ...

Cricut: How to Make a Congratulations Card
How to make You Will Need * A Cricut Maker * A4 Pastel Pop Premium Card * Cricut Scoring Wheel or Stylus * Cricut Debossing Fine Tip * Cricut Lightgrip Cutting Mat 12 x 12 Inches * Glue Stick * ...