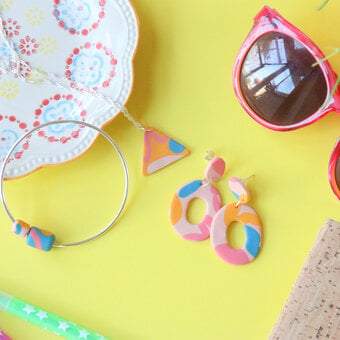
Summer Craft Ideas
We’ve got summer craft ideas to keep you making all summer long! Whether you’re looking for easy summer crafts that kids can enjoy during the school holidays or you want to transform seasonal inspiration into embroidery, home décor, baking and clothing customisation projects, there are endless ideas to try. You can even gather fantastic summer party inspiration to make your garden gatherings unforgettable.
Skip to Product Grid (Press Enter)
Filters
- Art - Free Downloads (2)
- Art - Ink Drawing (1)
- Art - Mixed Media (1)
- Art - Resin (1)
- Art - Watercolour (1)
- Baking - Cake Decorating (4)
- Baking - Candy and Sweet Making (1)
- View more
- Baking - Other (1)
- Cricut - Other (1)
- Cricut - Papercraft (3)
- Cricut - Vinyl (4)
- Crochet - Accessories (9)
- Crochet - Amigurumi (2)
- Crochet - CAL (2)
- Crochet - Clothing (3)
- Crochet - Home Décor (4)
- Crochet - Other (1)
- Decor & Hobbies - Clay Making (3)
- Decor & Hobbies - Fabric Dyeing (5)
- Decor & Hobbies - Other (5)
- Decor & Hobbies - Party Decor (2)
- Decor & Hobbies - Upcycling (4)
- Digital Crafting - Sublimation (4)
- Kids - Craft Activities (21)
- Kids - Face Painting (2)
- Kids - Painting and Colouring (2)
- Knitting - Clothing (1)
- Macramé (4)
- Occasions - Party (2)
- Papercraft - Other (2)
- Papercraft - Scrapbooking (2)
- Punch Needle (1)
- Sewing - Cushion Making (3)
- Sewing - Dressmaking (4)
- Sewing - Embroidery (3)
- Sewing - Fat Quarter Projects (12)
- Sewing - Other (2)
- Sewing - Quilting (1)
- Sewing - Soft Toy Making (1)
- Stash Busting Ideas (2)
- Weaving (1)
Viewing 1 - 48 of 132 Ideas
Viewing 1 - 48 of 132 Ideas


You've viewed 48 of 132 products
Related Products

Cricut: How to Make Foiled Cake Toppers
How to make Step 1 Start by opening up the project in the Cricut Design Space app using the project link at the top of this post, or alternatively use the link below - ... To access the project, copy ...

How to Knit a Festival Top
How to Make Abbreviations: K Knit P Purl YO Yarn Over st/sts Stitch/Stitches TENSION 14sts x 10rows for 10cm/4” square, using the yarn held double on 5.5mm needles in stockinette FINISHED MEASUREMENTS 18cm from top of bralette cup to bottom ...

How to Make Jungle Craft Rolls
How to make You Will Need: * Cardboard tubes * Cereal box * Acrylic Paint in Various Colours * A4 Paper in Various Colours * Tissue Paper in Various Colours * Googly Eyes * Pom Poms * Circle and Heart ...

How to Tie Dye a Summer Bag
How to make You Will Also Need - 250g salt - Scales - Bucket or basin to dye in - Rubber gloves View More Step 1 Weigh the fabric and then wash it. You'll need to leave it damp to ...

How to Make Animal Peg Dolls
You Will Need * White Card * Acrylic Paints * White Gesso * Wooden Peg Dolls * Tacky Glue * Scissors * Paintbrushes * A Pencil * Paint Markers (optional) View More Free Templates Download the PDF template here Download ...

Cricut: How to Make a Painted Bar Sign
How to make Step 1a Open the Cricut Design Space app and start a new project, and click the text button. Enter your menu text and choose your desired font (We've used 'Double Whipped' here) View More Step 1b You ...
Oops...
Sorry, we did not find any products that match the
selected filters. You can go back to previous results to
select something different.