How to Make Flag Bunting
Create a classic summer party decoration with our step-by-step guide to handmade flag bunting! Discover how to make colourful bunting, perfect for any celebrations or even decorating the kids' den at home. It's sure to brighten up any space.
Follow our simple step-by-step tutorial to craft traditional flag bunting and prepare to get lost in sewing! This is the perfect project if you're looking for creative ways to use fat quarters.
Project and instructions by Sophia Palmer
You will need


How to make
You will also need:
*Dressmaking scissors
*Pins
*An iron
*Thread
*A needle
Optional:
*A sewing machine

Note: All sewn edges use a 10mm ( 3/8" ) seam allowance.
Using the template provided draw and cut your bunting shape out of fabric.
You'll need 2 pieces of fabric per flag, so if you're making 10 flags, you will need to cut 20 fabric pieces.

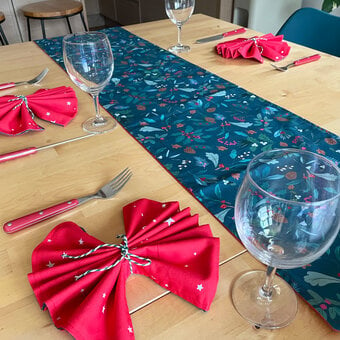
For each flag, put two pieces of fabric right sides together, and pin in place (as pictured)

Sew around the edges of the flag shape, leaving the top straight edge open.
Take your time keeping the same seam allowance all the way around.


Once sewn, trim off the corner carefully, in order not to cut into your stitch line.
This will help the fabric to shape when it's turned outside in.

Using your finger or a knitting needle, turn the flag outside in - so your right sides of the fabric are now on the outside of the flag.
Poke the inside until you can see the full flag shape, then press flat with your iron.
Cut the top edge corners of the seam allowance that poke out to make it straight.


Next get your bias binding.
If you want a longer length and need to join your binding together, open the binding out and cut a rough 45 degree angle off the corner (as pictured)


Use the picture for guidance within this step.
Lay your bias binding pieces right sides together, crossing over the 45 degree angle cuts to make this right angle shape.
Pin together. See where the two cross, there is a point shape pointing towards each other? Sew across to join the binding together.
Tip: The more you cross them over the bigger the seam allowance.

Lay your binding out in the usual way and trim the excess to make the outer edges straight again. Press the binding back to its original folded shape.

Find the centre of your binding and mark it with a pin, use this to plan out the pattern or order you want your flags to go in.
Fold your binding in half (wrong sides together) over the top edge of your flags. You can now decide how far apart you want the flags to be from each other, we've opted for a 5cm gap between each flag.
Tip: Avoid placing your flags more than half of the flag width apart, this will stop it looking too spread out and empty.

Pin your flags to the binding once you're happy with their positioning, making sure the flag is sandwiched between the folded binding.
Be sure to leave a nice length of binding at both ends without flags, so that you have plenty of binding to hang your bunting.

To neatly finish the binding ends, fold the end corners towards the centre to create a point and press flat.
Fold this point down toward the rest of the binding, to create a straight edge and press again.


Fold the binding in half (wrong sides together) just like you did over the flag sections. Pin the end in place, ready for sewing.

You are now ready to sew along the whole length of your binding to stitch all your flag in places and finish the bunting.
Sew very close to the edge of the open side of the binding.
Going slow whilst you sew it all together will ensure that you catch all the layers.
Once sewn, your bunting is all finished!

Craft with us at our workshops


Related Products